0
Discussions for Scenes for Version 1.2.X Fullscreen Mode here Форум / Всё о iStripper
littleEvilMe
Joined in Oct 2015 42 Сообщения
29 November 2018
@orclover
Many thanks for this, i find this very interesteing and would definitely like to try it out, but It seems quite a complicated to install, especailly for a complete shader novice like me, so i may well come back to you and ask a couple of questions if i get stuck.
btw i dont suppose you know of any video tutorial on youtube or whatever that i could look at to watch how its done?.
@FalconAf
Firstly sorry to here about your accident, it sounds ***** i am glad that you are ok and back to normal ASAP.
So yeah the 720p clips Do look awsome, I could not belive it myself either where i was watching it and thinking dam these 720p clips look better then the 1080p ones.
As to how it happened, you are correct anti alias is used. Nothing flash just the standard one that everyone else uses. The coding for the frame buffers were lifted straight out of titti's pole scene scene of a few years back, with nothing extra added from me.
In truth i have absolutely no idea why there is an increase in quality for the 720ps , my guess is that because the clip size is so large that this has some sort of a reducing effect on the jaggys anyway and then the AA just finishes the job so to speak.
Just one of those happy accidents i guess, there were a few of them that went into making my scenes.
Glad you are watching on a VR headset, how are you findind the camera animation, that was the one thing i was not sure if it would translate well to VR headset viewing, but i guess it is working good for you?
The Best News is that i still have a shedload more scenes to upload and some of these are like the best work i have ever done imo just got a few tweeks i need to make but these will be up soon.
I am so glad that you are all enjoying the scenes, they are so much fun to make, i really enjoy making them, so i will keep creating as long as people still want to watch.
On a general note, What are people opinions on the clip name tags, I have a few clubs that are pretty much done, bar the name tags, but with the camera motion the tags are a ***** in the arse to do, so if people aren't to bothered about them, i may not bother to do them on the scenes that have not been done. Let me know on that one.
anyway
Once again cheers guys for taking the time to watch them all, once i have uploaded all the scenes from all the clubs, i will say and then if anyone wants me to do one for a club that i have not done, then just let me know i would be happy to oblige provided i can get good enough background images of course.
FalconAF
Joined in Jan 2008 149 Сообщения
29 November 2018
@littleEvilMe
Thanks for the reply. I was wondering what the framebuffer reference was in the scene file where the antiAlias.fsh was listed for the clip(s), so I'm gonna have to go find titti's pole scene to see what that coding is all about.
Camera Animations with VR Headset: For the most part, they work fine. I haven't found any "This Sucks!" issues with them. ;-) With the Rift and using the curved FOV Virtual Desktop, I can still see the entire scene but it is just "curved around me" as if I was sitting in the center of a huge TV that wrapped around my FOV 150-degrees. I would have to turn my head then to see the left and right sides of the scene display with that kind of screen in front of me. With the Rift on, it works the same way. I have to turn my head to see the farthest left/right parts of the scene display. So when your camera moves the scene (and models) around, I have to turn my head to "follow" them depending on how far they move, etc. There are many times when my peripheral vision (side vision) will notice a model off to the side of me (like a hand waves or something) and I will have to turn my head to "see what's going on there". My doctor would love ehat you've made me do. I have to do Physical Therapy neck exercises every day, turning my head and neck in all 6-axis of motion as part of my daily routine. Heck, using your scenes with my Rift I'm like one of those bobble-head sports figures looking all around the strip club scenes. Getting lots of PT exercise...and it isn't boring now.
Clip Name Tags: I don't care one way or another about having the tags while the scene is playing. Either way works for me. What is bothersome though is the length of the Scene File Name. They are way too long for the scene name display in the Full Screen list page GUI. They get truncated long before you can see the end of the name saying what is "in the scene". One possible solution might be to use the "text" file included with the scene (the one you are now using that lists the address, etc, of the club under the scene name display) to also list what's in the scene ("Main Stage, Pole, 3 Girls", etc). If there wold be enough space there with the already included club information. That way, you could keep the Scene Names shorter, like "Sapphire's, Las Vegas, Scene 1" or something. Anything that would allow the ENTIRE Scene name to not run out of display space under the scene picture in the GUI. I have scenes from other developers that use that "text file" area display to show their name and other things about the scene there. And evidently you can even make the text different colors as some users have done. (Note: None of this is a complaint...just a suggestion).
Regardless, you're doing fine. I'm looking forward to your next scenes.
TheEmu
Joined in Jul 2012 3309 Сообщения
29 November 2018
@FalconAF - the Desktop and Fullscreen Scenes modes appear to use different "rendering engines". That used for the Desktop mode seems not to use any GPU and uses a very basic algorithm for scaling the clip (probably just linear interpolation between nearest points in the source image) while the rendering engine used for the Fullscreen Scenes mode does use the GPU if one is present. A hardware feature of most GPUs provides a better scaling aglorithm essentially for free which means that low resolution clips look far better when rendered as part of a fullscreen scene than when they are rendered at the same size on the desktop.
FalconAF
Joined in Jan 2008 149 Сообщения
29 November 2018 (edited)
@TheEmu - I knew about the Full Screen using the GPU for better rendering and saw that in some of my earlier scenes I created a long time ago. But now it is obvious there are some other things we can incorporate into the full screen scenes that even improve on it just being the GPU doing the rendering . My 780p cards never looked this good when they were "up close and personal" in the past, and since I hadn't downloaded any new(er) scenes in quite a while, I was surprised by the 720p improvements now. I've been looking at the scene files and there are several new (to me) entries in them which are still uncertain to me as to what they do and how they work. So I've decided to bite the bullet and start reading the scene creation thread again from the start. When I'm done I'll ask the questions that doing that hasn't answered for me yet. Like..."Why are the clip ID source clipnames different than the framebuffer ID source clipnames in the scene file?" Like Clip1 vs Clip1A. Obviously, I need to learn about the "framebuffers" thingie. ;-)
I looked for the "titti's pole scene" but couldn't find it, so can't reference that scene file littleEvilMe talked about.
Coffee. 80 pages. I'll need more coffee...... 8-)
I looked for the "titti's pole scene" but couldn't find it, so can't reference that scene file littleEvilMe talked about.
Coffee. 80 pages. I'll need more coffee...... 8-)
littleEvilMe
Joined in Oct 2015 42 Сообщения
29 November 2018
@FalconAF
As i remember titti used to pst his scenes on his own thread. Just had a quick look for you and this was the original link to the pole scenes he created.
http://scenes.virtuastripper.net/titiii_pole.zip
Just checked and it still works.
As far as the framebuffers go, to be absolutley honest i dont really know how they work (yeah i know i am such a fraud lol), but i can tell you how i have used them in the scenes i have written and hopefully that will help you, Firstly you do need the original clip for the frame buffer to work, hence the normal clip without the AA, and this has to be known to the program and hence has a name eg "clip" or "clip 2" whatever, then the framebuffer takes that clip does its thing and then outputs it to a new clip which you also have to give a name so "clip1A" or "clip2A" as appropriate.
So when you want to play the improved quallity clip you build the clip1A name into your clipsprite nodes so that this is what you seeon the screen and the original clip 1 or whatever just stays in the background and is not actually seen, but you do need them both or the clip that you do want to see will not work.
other then that i dont reaaly know, i am sure other s could give a much better technical description then that.
FalconAF
Joined in Jan 2008 149 Сообщения
29 November 2018 (edited)
@littleEvilMe (and @TheEmu too)
Thanks! Using your info above I got titti's scene, used your explanation in your post, compared titti's scene file with some other scene files I downloaded that used framebuffer and antiAlias.fsh, and I was able to modify some of my own old scenes with them and even THOSE scenes now display the 720p clips in them much better now. Initially it didn't work...until I figured out I had to add the antiAlias.fsh shader file to my own scenes folders too...Duh!
It all makes sense now on what the framebuffer and antiAlias.fsh entries do.
Never too old (or bored) to learn something new. Now I gotta go read all the lighting stuff that got "updated" in this thread since the last time I tried using that stuff. And more shaders too!
Thanks again!
Z22
Joined in Aug 2017 1166 Сообщения
30 November 2018
A hardware feature of most GPUs provides a better scaling aglorithm essentially for free which means that low resolution clips look far better when rendered as part of a fullscreen scene than when they are rendered at the same size on the desktop.nope, it looks to be using linear/bilinear. I know because its why i have had so much trouble with the enhancement shader because the scaling introduces cross artifacts which get amplified by the shader. There is the code in memory for much more advanced upscaling but it doesn't appear we have any commands to enable them.
x26638184
Joined in Oct 2018 189 Сообщения
2 December 2018
Interesing theme:
A good visualization depends on many factors: Hardware, Input Input, Output Output. Perceptual distance of the support (screen), etc
Many of the clips do not have the same pattern. Some have "Unsahrp Mask" and others do not.
On the other hand the processing of the alpha mask influences a lot. In the demo, I'll get pixels 2, blur 2 and apply matte to 1 so that it integrates well into the background and eliminate the native ghosting of the clip.
On the other hand, I worked with a 3 K clip, this allowed me to climb up to 170% at 1080p for zoom in.
It is an issue that is seen case by case
In the demo you see the result.
https://www.youtube.com/watch?v=T5Htd74xVkc&feature=youtu.be
While I'm doing this with Final Cut and Metal support (No Open CL) good results are achieved. The basic principle is the same in both cases.
Z22
Joined in Aug 2017 1166 Сообщения
11 December 2018 (edited)
https://drive.google.com/open?id=17dyzXu0FnIbscY7jgXRDR8jywRle3cDL
Self shadowing normal mapped lighting.
Still need to redo the normalmap shader.
Self shadowing normal mapped lighting.
Still need to redo the normalmap shader.
x26638184
Joined in Oct 2018 189 Сообщения
22 December 2018
Technical doubt:
Does anyone know how to optimize the performance of the iStripper software?
I explain many OSX software by pressing Shift and start them, disable everything unnecessary (Internet connections, plug-in, etc, etc) This makes performance gain running (eg: Photoshop starts in 10 sec, if pulse shift starts in 4 and it flies at incredible speeds at the cost of deactivating everything that I will not occupy)
In the case of istripper if I disable the wi-fi and share something similar happens, but I need to render faster to make captures at 60 fps in 3K (Currently I only get 20 FPS)
I want to start the next project phase in native 3K.
In the beginning I thought that my hardware was not enough, but the last tests proved me not (The reference image is a native 4K video captured at 3K with 45 fps) Acceptable !!!.
Investigating I saw that the problem derives in the engine of execution of the software QT 5.4 (2015) Something old and little optimized for the current time.
If anyone knows tips, I'll be grateful. (and those who occupy OSX as well)
A possible solution may be that the scene is as basic as possible (Girl and background color - by code not by image-)
This is the typical scene that I occupy:
clip {
id: MyClip
deny: pole, table
}
texture {
id: fondo
source: fondoazul.jpg
}
//CAMARA
camera {
type: 2D
size: 1920, 1080
}
//FONDO
sprite {
pos: 960, 540
hotspot: 0.5, 0.5
size: 1920, 1080
opacity: 1.0 // AJUSTAR OPACIDAD ACA
source: fondo
blend: true
}
//ORIGINAL //////////////////////////////////////////////////////
clipSprite {
pos: 960, 1070, 1
scale: 1.0
source: MyClip
}
clipNameSprite {
scale: 0.5
pos: 400, 450, 1
hotspot: 0.5, 1
source: MyClip
}
}
Z22
Joined in Aug 2017 1166 Сообщения
23 December 2018
source: fondo
blend: true
remove the blend as it is not needed. blends can sometimes cause slowdowns.
blend: true
remove the blend as it is not needed. blends can sometimes cause slowdowns.
Z22
Joined in Aug 2017 1166 Сообщения
23 December 2018 (edited)
https://drive.google.com/open?id=1cydUivq4tFNYQ310qDvxtgB6dM7ul2g_
Newer version of Enhance.
I finally figured out how to remove the compression/scaling glitch i was calling tarten, turns out it's really simple to do. S&C.fsh basically samples a circlular area and a clover leaf area, then subtracts the later from the former and that result is then taken away from the source. In this scene the source girl is in the middle with the result of S&C on the left.
The "fix" is most noticable if you take a screenshot of a girl wearing a red outfit(it does happen on most if not all though), on the source you will see large blocky gradients and a grid like pattern along the edge of the clothing, S&C removes most of the problems.
S&C is used as a prefilter for diffsharp and enhancem
I have vectorised a lot of enhanceM.fsh and made a few other tweaks. At least where i could see it was possible, i think it can be simplified more but this works. any suggestions @TheEMU? I also removed the addition of noise in enhancem as S&C somehow is adding a dither... F knows how but cool, free dither.
TheEmu
Joined in Jul 2012 3309 Сообщения
23 December 2018
@Z22 - get a Not Found Error when trying to access that link.
Z22
Joined in Aug 2017 1166 Сообщения
23 December 2018 (edited)
ahh, it has a _ on the end, the forum didn't like them i seem to remember now.
new link
https://drive.google.com/open?id=14k5Jtl5XyvQCDmn_ST1SFSVYNb_NeeEG
new link
https://drive.google.com/open?id=14k5Jtl5XyvQCDmn_ST1SFSVYNb_NeeEG
x26638184
Joined in Oct 2018 189 Сообщения
27 December 2018

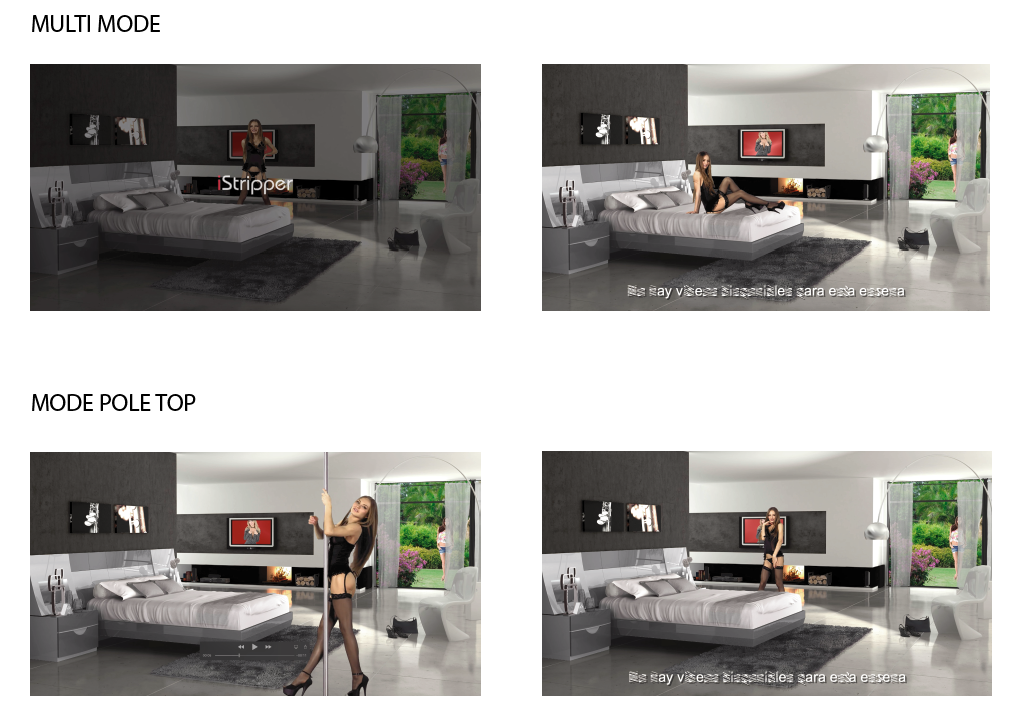
I started doing a multimode scene (Pole, Table, Top), but something does not turn out well.
When going to the second mode pressing left arrow gives me an error and the third mode does not load either.
I leave it to you to play because you can do a lot with this scene.
https://drive.google.com/drive/folders/1fRMsw54-49DElnI66s8Id1PIVzjhIFZY?usp=sharing
When going to the second mode pressing left arrow gives me an error and the third mode does not load either.
I leave it to you to play because you can do a lot with this scene.
https://drive.google.com/drive/folders/1fRMsw54-49DElnI66s8Id1PIVzjhIFZY?usp=sharing
27 December 2018
Ok. I'll take a look at this.
Just one thing, my friend. You have uploaded the different scenes separately and also included the .scn cache files. These are just Totem's automated copies that allow faster loading of each scene in the preview window.
In future, could you please just zip-up the scene folder so it's just one download. Thanks! I'll go check out your code now...
x26638184
Joined in Oct 2018 189 Сообщения
27 December 2018 (edited)
Ok, I deleted the cache (I forgot)
It is better to leave it as folder view and not as .zip. It is easier to make updates.
The images of the TV and the Garden can be changed, the reference of the .png is copied inside the folder and it is renamed.
Work with scale is easier.
The scene is set to 4K with 16: 9 self-scaling ratio
If you solve the multi mode (which I think you can) it would be perfect and so you do not have to make a scene for each mode.
27 December 2018
Ok. We need the original blank or clear background image, not just the 'Referencia.'
Start again. Zip-up the whole folder with images included as you originally named them and then upload. The scenes won't work without all your original info...
Start again. Zip-up the whole folder with images included as you originally named them and then upload. The scenes won't work without all your original info...
x26638184
Joined in Oct 2018 189 Сообщения
28 December 2018
ok, Done !, I'm compressed as .zip
x26638184
Joined in Oct 2018 189 Сообщения
28 December 2018
In Multi mode or Pole Top mode, let it run for 10 seconds and then press right arrow. if it does not load, press again right arrow or date below. The second mode loads it but with error.
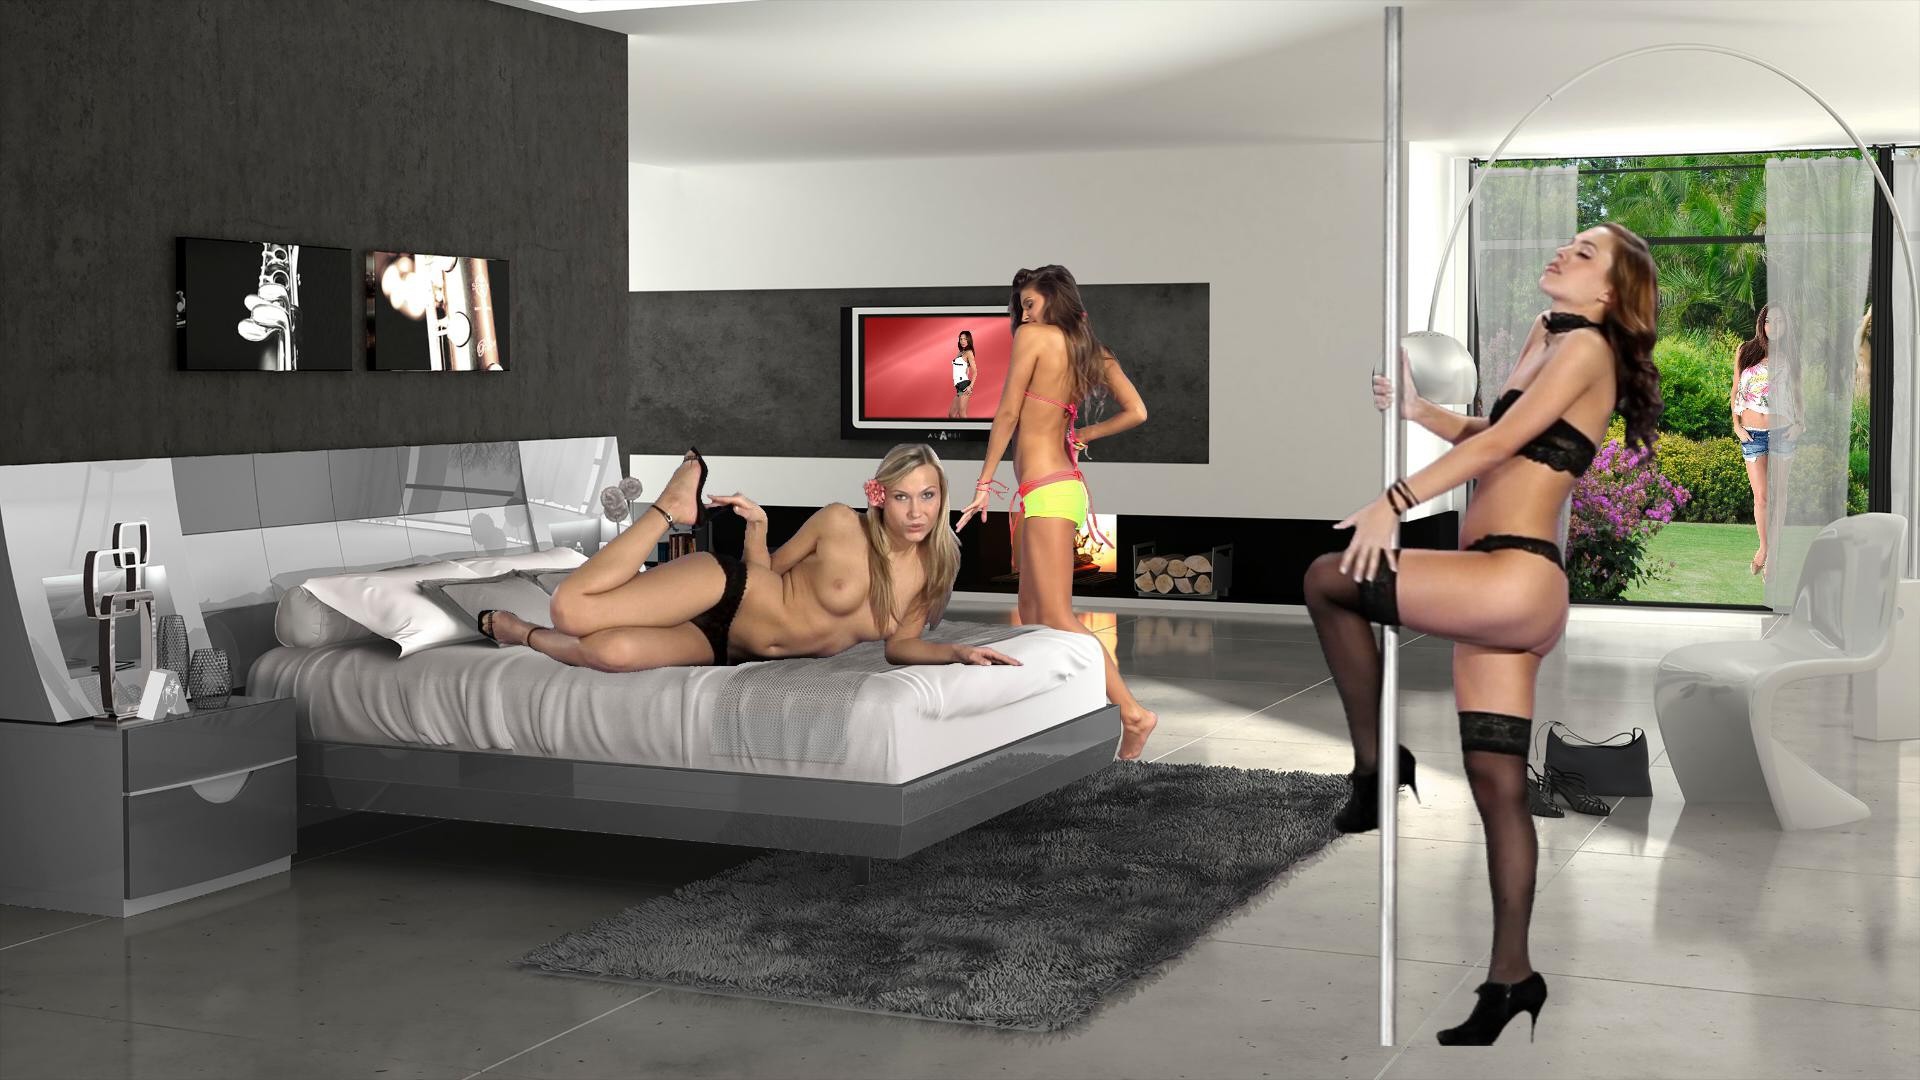
28 December 2018 (edited)
GREAT! Now I can see your scenes. First of all, you need to resize each model (Clip) individually to look realistic in the given position. This is done by trial and error till it looks natural. Bear in mind tho that some models' clips were encoded by Totem that do not measure the same as the rest. Occasionally, a girl's head can go off the top of the screen for this reason. Not our fault but a post production, how should I put it, Glitch?
I have to sleep now as I'm up early mañana but the other problems I'm seeing with no background visible is probably a simple coding error.
Keep coding, dude!😜
Edit: Before I go. In these scenes, we can actually place clips like on the TV in your scene with shaders if you like, to look almost exactly like your amazing videos. Wanna try that, buddy?😋
I have to sleep now as I'm up early mañana but the other problems I'm seeing with no background visible is probably a simple coding error.
Keep coding, dude!
Edit: Before I go. In these scenes, we can actually place clips like on the TV in your scene with shaders if you like, to look almost exactly like your amazing videos. Wanna try that, buddy?
28 December 2018
@Alarsi
I've had a play with your first Scene File.
I am not entirely certain what you are trying to achieve but you can see what I've done in the scene file. I am afraid the comments are in English so you may need to translate them.
https://www.dropbox.com/s/i54yw9bdzk6kyjo/Alarsi%20-%20The%20House%20-%20Room1%20-%20Multi%20Mode_No6.zip?dl=0
Just extract the scene file from the zip file and copy it to your scene folder. I've amended the scene name slightly so it won't overwrite your current scene.
Hope this is of help.
As @HombreSinSombra has stated above there can be a great disparity between clip heights, particularly between older cards and new cards so the sizing of the clips in the scene may not always work correctly. I tend to shy away from multiple model scenes because of this.
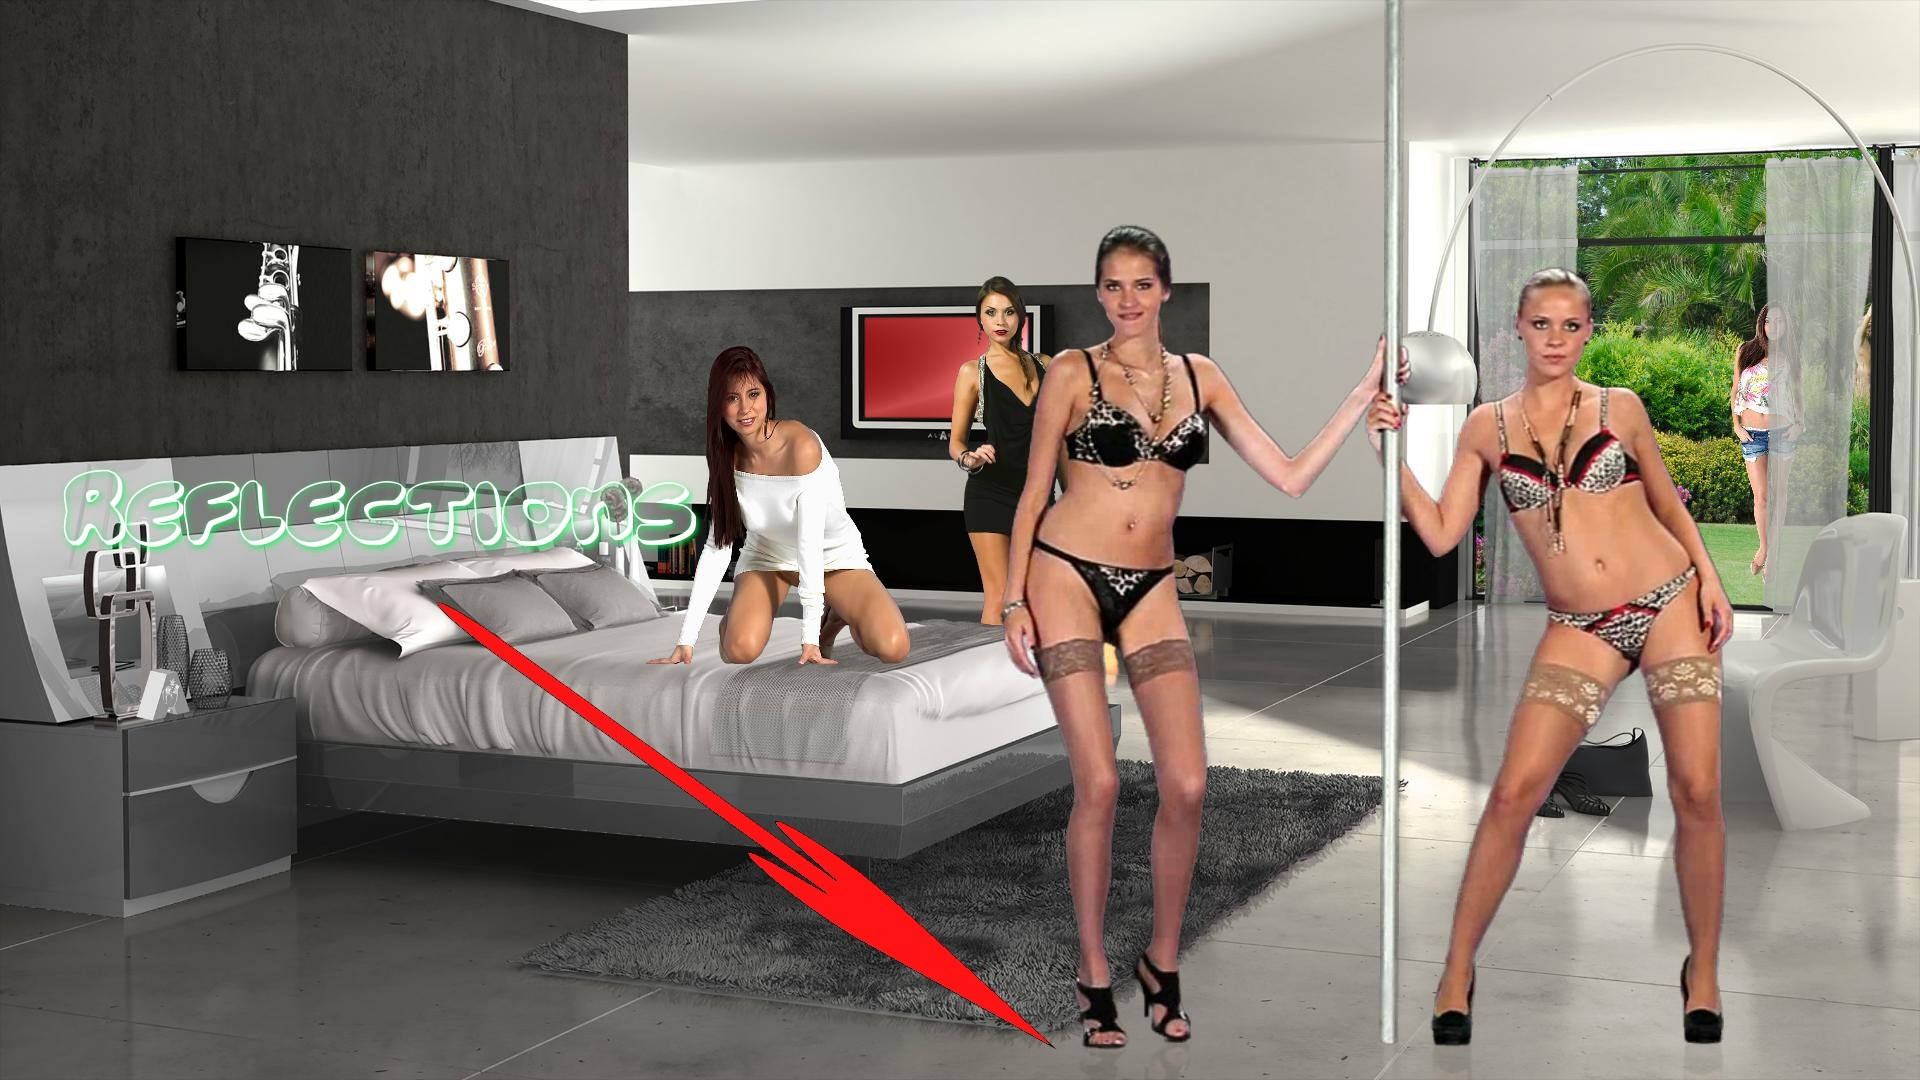
28 December 2018 (edited)
Ok. Took the day off as my leg is ***** me. 😰
I like what @No.6 did with your scene, adding the swing clips in the window :)
As he states in the scene code, it's best to size the clips using standingHeight: or sittingHeight: . Don't use scale: This will make each clip radically different heights each time.
When I downloaded your scenes, the code looks very messy. The lines are all overlapping and very difficult to follow. Sometimes that can happen and it's nobody's fault but anyway, I cleaned up all the code and here it is with all my alterations and comments. Btw, to comment '//' out something only needs two forward slashes, not 3 or more. This is standard throughout coding, I believe.
I added a girl on your TV just as No.6 added a swing clip in the garden. Here's my new code and a screencap to show how it looks :)
//logo: logo/logo_istripper.png // Commented these out so they don't show. Very annoying in scene changes!
//splash: logo/small_logo_istripper.png
text: logo/text.txt
////////////////////////////////////////////////////////////////////////////////
clip {
id: GirlTop
deny: pole, table, top, accessories, inout, cage // Now will only play standing clips.
}
clip {
id: GirlTable
allow: fronttable // Now will only play front or 'On-Table' clips.
}
clip {
id: GirlPole
allow: pole // Now will only play pole clips.
}
clip {
id: GirlTV2
deny: pole, table, top, accessories, inout, cage // Added this on the TV screen.
}
texture {
id: Fondo
source: fondos/dormitorio1.png
}
texture {
id: Cama
source: fondos/dormitorio1_cama.png
}
texture {
id: jardin
source: fondos/dormitorio1_jardin.png
}
texture {
id: GirlGarden
source: fondos/GirlGarden.png
}
//texture {
//id: GirlTV // Commented '//' this out so it won't show the image.
//source: fondos/GirlTV.png
//}
camera {
type: 2D
pos: 1520, 1080
size: 3040, 1710
}
//FONDO TV
quad { // Non textured quad polygon.
size: 600, 600
pos: 1300, 100
hotspot: 0, 0
shader: fragment, redwater.fsh // fragment or vertex and source file of the GLSL shader.
}
//GIRL TV // Added this so a clip plays on the TV.
clipSprite {
pos: 1520, 720
standingHeight: 200
scale: -1, 1, 1
source: GirlTV2
}
// GIRL TV // Commented out so it doesn't show in the scene.
//sprite {
//scale: 0.5, 0.5
//pos: 1520, 700
//source: GirlTV
//blend: true
//}
// GARDEN
sprite {
size: 733, 746
pos: 2700, 600
source: jardin
blend: true
}
// GIRLGARDEN
sprite {
scale: 0.5, 0.5
pos: 2800, 700
source: GirlGarden
blend: true
}
// ROOM
sprite {
size: 3040, 1710
pos: 1520, 855
source: Fondo
blend: true
}
//GIRL TOP
clipSprite {
pos: 1600, 1200 //I altered The pos:, added standingHeight: (we can use sittingHeight: for table clips and the scale: -1, 1, 1 to correct the mirror image of the clips.
standingHeight: 750
scale: -1, 1, 1
source: GirlTop
}
//CAMA
sprite {
size: 3040, 1710
pos: 1520, 855
source: Cama
blend: true
}
//GIRL TABLE As above :)
clipSprite {
pos: 1200, 1050
sittingHeight: 440
scale: -1, 1, 1
source: GirlTable
}
//GIRL POLE As above.
clipSprite {
pos: 2200, 1650
standingHeight: 1300
scale: -1, 1, 1
source: GirlPole
}
light {
ambient: 1.0, 1.0, 1.0 // I didn't bother with this as it does nothing.
}
}
Edit: You can add this chunk of code to give a reflection under the pole-dancer clips. You can un-comment the 'color' part and that will make it a shadow. You can alter the numbers to make it darker if you wish...
//Reflection
clipSprite {
pos: 2200, 1650
standingHeight: 1300
//color: 0.1, 0.1, 0.1
opacity: 0.1
rot: 180, 0, 0
scale: -1, 1, 1
source: GirlPole
}
Z22
Joined in Aug 2017 1166 Сообщения
28 December 2018
camera {
type: 2D
pos: 1520, 1080
size: 3040, 1710
what weird ass screen size is that?
size: 3840, 2160
pos: 1920, 1080
is 4k. This will throw off all the other sizes and positions though until fixed but won't look odd on other peoples 16:9 displays
scale: -1,1 //you are working in 2d not 3d so you dont need the third arguement.
light {
ambient: 1.0, 1.0, 1.0 // only affects sprites that have material enabled.
}
blend: true //check these one by one to see if you actualy need them or not as they can cause significant slowdowns.
28 December 2018 (edited)
When I downloaded your scenes, the code looks very messy. The lines are all overlapping and very difficult to follow. Sometimes that can happen and it's nobody's fault but anyway, I cleaned up all the code and here it is with all my alterations and comments. Btw, to comment '//' out something only needs two forward slashes, not 3 or more. This is standard throughout coding, I believe.
@HombreSinSombra
What did you use to edit the code?
When I opened the first scene in Notpad++ all of @Alaris71"s code looked fine. It was all on separate lines and correctly indented.
I did also suggest in the comments in my scene file that it may be possible to replace the swinng clip with a Glass Washing clip.
Z22
Joined in Aug 2017 1166 Сообщения
28 December 2018 (edited)
@Z22
Not sure why @7171al71 picked those sizes however I think it may be because 3040 x 1710 is the dimensions of the picture file for the room.
It does actually scale correctly for a 16:9 scn.
Thing is... it is scaling it, that adds processing.
texture
{
id: Background
source: whereveryouputit/background.jpg
size: 3840, 2160
}
Will only scale the background rather than every element in the camera node.
It is better to have previously scaled the background source picture though so it does no scaling other than the standing heights ect.
28 December 2018
Ahhh! I open .scn files in Notepad. I use Notepad ++ for shader code. I guess I should use Notepad++ for everything 😐
I copied and pasted my code from Notepad here and even that got messed up a bit. We all learn every day😊
I'm so used to working with 3D cams that I automatically use XYZ. No worries. Imho, this scene would be better with a 3D cam set-up. The first or GirlTop clip could be set further back on the Z axis...
With the added reflection code, here's what it looks like. Adds a little more realism to the scene methinks...
@Alarsi: Got plenty to play with here, buddy!😎
I copied and pasted my code from Notepad here and even that got messed up a bit. We all learn every day
I'm so used to working with 3D cams that I automatically use XYZ. No worries. Imho, this scene would be better with a 3D cam set-up. The first or GirlTop clip could be set further back on the Z axis...
With the added reflection code, here's what it looks like. Adds a little more realism to the scene methinks...
@Alarsi: Got plenty to play with here, buddy!
Z22
Joined in Aug 2017 1166 Сообщения
28 December 2018
I'm not sure there is much point in using a 3d cam unless you are using lighting and material or want the girls to occlude each other because thier z changes/time like in the carrousel. It probably doesn't make any difference to the speed, just how much of a headache positioning the girls is.
Вам ещё не разрешается участвовать
Будучи бесплатным пользователем iStripper, вам не разрешается отвечать на форуме или же создавать новую тему.
Но вы можете просмотреть основные категории форума или познакомиться с его участниками !